Nebula Mesh with SSO
Nebula is a great tool for creating mesh networks in your infrastructure. Wouldn't it be great if you could allow your users to connect to the mesh on-demand using their user credentials?
Nebula Authentication
Nebula uses a custom protobuf certificate format to authorise node communication. The certificate includes everything other nodes require in order to communicate with another authorised node -- ip address, group list, subnets, and importantly an expiry date. This lets us issue short-lived certificates to users that want to join the mesh, and also means we dont need any infrastructure to communicate these new nodes to other nodes. The certificate contains all the information.
The current state for enrolling new nodes on a Nebula mesh is to use the nebula-cert program to create and sign certificates. You could get users to generate a keypair, send the public key to an administrator for signing, then get back the resulting certificate for installation on a users comptuer before connecting to the mesh - however this is tedious and leads to long-lived certificates which could be compromised.
Instead, lets create a service that will take in a signing request, check user credentials, and return a short-lived certificate to the user on-demand.
Nebula Mesh Admin
I created a simple mesh administration WebUI which:
- Waits for signing request
- Checks user credentials and obtains a list of groups
- Assigns an IP address from a subnet
- Returns a signed certificate
It uses OpenID Connect to check user credentials and relies on the signing endpoint being given a valid access token. Groups are retrieved from the userinfo endpoint, and it also includes some basic enrollment services (so you can onboard permanent members of the mesh network easier).
The code is available on GitHub (https://github.com/unreality/nebula-mesh-admin), so lets try it out.
Set up a new mesh admin
Nebula Mesh Admin can run in a docker container, which is probably the easiest way to get started.
Requirements
- Docker daemon (or other container runtime)
- An OpenID endpoint
- If you need an OpenID endpoint to test with, Keycloak is an easy way of creating a local one. Have a look at their quick start guide for docker at https://www.keycloak.org/getting-started/getting-started-docker
- A lighthouse node
- A Windows 10 machine
Build the container
First, we need to build the container:
1git clone https://github.com/unreality/nebula-mesh-admin.git
2docker build -t nebula-mesh-admin:latest nebula-mesh-admin/
Configure the OIDC client
You'll need to configure your OIDC client app. For Keycloak that means logging into the admin console, selecting your realm and creating a new client.
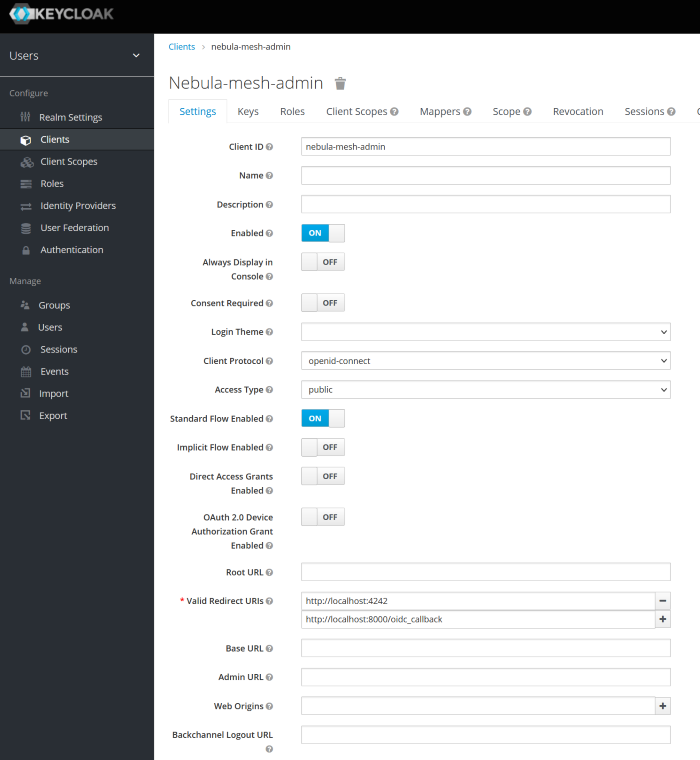
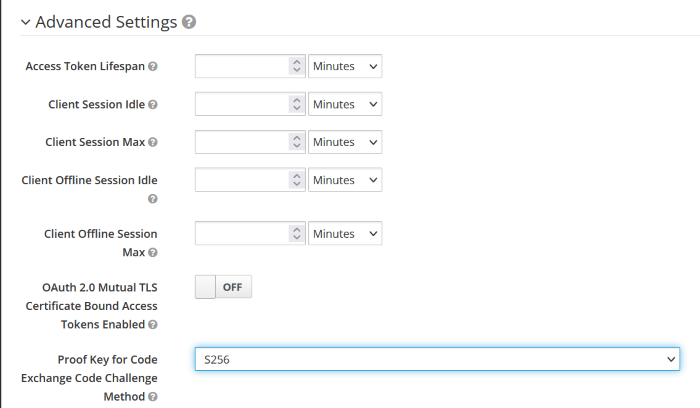
Nebula Mesh Admin uses the Authorization Code Flow with PKCE so ensure to configure your client with those enabled (Keycloak calls Authorization Code Flow 'Standard Flow').
You will need to configure two redirection URIs for the client:
/oidc_callbackon your Nebula Mesh Admin (eg if you deploy your mesh admin locally, the complete redirect uri will behttp://localhost:8000/oidc_callback)http://localhost:4242/- This is the redirection URI used by the mesh users. It is always redirected back to localhost so the connecting client can obtain a JWT outside the browser.
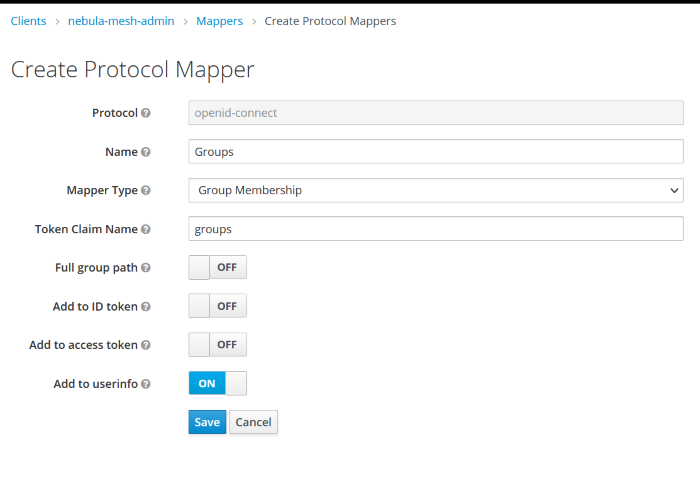
If you are running keycloak, you will also want to create a Group Mapper so that the userinfo endpoint contains your groups
Deploy the container
Next, we need to run the container, specifying a few required environment variables to configure the mesh admin:
OIDC_CONFIG_URL- URL for the .well-known configuration endpoint. For Keycloak installs this will be in the format http://your-keycloak-host/auth/realms/your-realm-name/.well-known/openid-configurationOIDC_CLIENT_ID- The OIDC client ID you have created for the Mesh AdminOIDC_JWT_AUDIENCE(default is 'account') - The OIDC server will return a JWT with a specificaudience- for Keycloak installs this is 'account', other OIDC providers may specify something differentOIDC_ADMIN_GROUP(default is 'admin') - The OIDC server must have a 'groups' element in theuserinfo. If this value is in the groups list, the user can log into the admin area. For keycloak installs this means adding a Groups Mapper to your client in the Keycloak admin area (when in your client, click on the mappers tab, and add a new mapper - choosing the User Group Membership as the type) There are also some optional variables:OIDC_SESSION_DURATION(default 1 hr) - How long a user session stays active in the admin consoleDEFAULT_DURATION(default 8 hrs) - default time for a short-lived certificateMAX_DURATION(default 10 hrs) - maximum time for a short-lived certificateMESH_SUBNET(default 192.168.11.0/24) - mesh subnetUSER_SUBNET(default 192.168.11.192/26) - ip pool for short-lived (user) certificatesCA_KEY- path to CA key. If not specified one is generatedCA_CERT- path to CA cert. If not specified one is generatedCA_NAME(default 'Nebula CA') - If a CA cert/keypair is generated, this is the name specified when generatingCA_EXPIRY(default 2 years) - If a CA cert/keypair is generated, this is expiry time used when generatingTIME_ZONE(default UTC) - timezone for rendering expiry timesSECRET_KEY_FILE- secret key file for holding a Django SECRET_KEY. If not specified one is generated
1docker volume create nebula-vol
2docker run -d -p 8000:8000 -e OIDC_CONFIG_URL=your_oidc_config_url -e OIDC_CLIENT_ID=your_oidc_client_id -v nebula-vol:/persist nebula-mesh-admin:latest
Log into the Mesh Admin
You can now access your mesh admin at http://localhost:8000, and login with your user credentials - provided you are a member of the OIDC_ADMIN_GROUP you specified earlier. Go to the Lighthouses section and create a new lighthouse, entering the internal and external ips for your lighthouse.
Onboard your lighthouse
To make onboarding a little easier, nebula-helper is available. Click on 'Enroll Host' in the mesh admin area. Enter your lighthouse internal ip in the 'IP' section, expiry of 31536000 (ie 1 year), a hostname, and a set of groups (optional). Clicking 'Create Token' will create a one-time token you can use to enroll a server on the mesh:
1nebula-helper -action=enroll -ott=OTT_TOKEN -server=http://your-mesh-admin-url/ -config-path=/etc/nebula
nebula-helper creates a new keypair, and exchanges the one-time token and public-key for a new Nebula certificate. It will also generate configuration which specify the CA, keyfile, nebula certificate, and lighthouses:
 1pki:
 2    ca: ca.crt
 3    cert: node.crt
 4    key: node.key
 5    blocklist: []
 6static_host_map:
 7    192.168.11.1:
 8      - LIGHTHOUSE_IP:4242
 9lighthouse:
10    am_lighthouse: false
11    hosts:
12      - 192.168.11.1
Since this node is a lighthouse, we need to remove the lighthouse config section. You may also need to edit the paths to ca, cert, and key to be full paths - depending on how you launch nebula.
1vi /etc/nebula/zz_controller_config.yml
 1pki:
 2    ca: /etc/nebula/ca.crt
 3    cert: /etc/nebula/node.crt
 4    key: /etc/nebula/node.key
 5    blocklist: []
 6static_host_map:
 7    192.168.11.1:
 8      - LIGHTHOUSE_IP:4242
 9lighthouse:
10    am_lighthouse: true
Once removed, launch Nebula on your lighthouse:
1systemctl start nebula
Connect to the Mesh using your user credentials
Finally, we are ready to connect to the mesh using our user credentials. Download nebula-windows-ui and create the tunnel profile directory C:\Users\YOUR_USER\AppData\Roaming\Nebula\my-mesh. Inside that directory create a new file called metadata.json with the content:
1{
2    "controller_url":"http://localhost:8000",
3    "fingerprint":""
4}
nebula-windows-ui will look for a metadata.json file within the tunnel config path and if present, will use those settings to retrieve a short-lived certificate from a controller - in this case Nebula Mesh Admin. You will also need to copy a default.yaml config file into the mesh config path, using the example config from Nebula is fine, just ensure it is named 'default.yaml'.
Launch nebula-windows-ui and from the systray select the nebula client, then 'my-mesh' and select 'Activate.' If all has been set up correctly, your web browser should open to your OpenID login screen, and upon entering your credentials a tunnel will be brought up, and you can start sending traffic to your lighthouse node via the mesh.
Wrap-up
This is more a proof-of-concept than a complete product at the moment. There are a number of improvements that could be made, but the mesh admin shows how we can use short-lived certificates to authenticate users, and give a similar 'sign on' experience as more traditional VPNs like OpenVPN/PulseVPN/etc.
Limitations
Nebula Mesh Admin has several limitations:
- Mesh connections are not actually torn down when a certificate expires! There is a pull-request so solve this, but it seems the nebula maintainers are quite slow to merge in requests at the moment.
- The CA Key is particularly sensitive, it would be great if this was hosted elsewhere (maybe in a Vault) and the mesh admin asked another service to sign certificates.
- The blocklist is only retrieved on connect. It should be trivial to write something that gets the blocklist on a schedule.
- A user can authenticate several times and obtain a session. To stop this a node would have to continually retrieve the blocklist, and when a user authenticates repeatedly, any non-expired fingerprints should be added to the blocklist.
- It only supports OpenID Connect as authentication backend. People always want LDAP.